Welcome to chapter 2 - RAID in practise of our practical miniguide of a server administration of operating system GNU/Linux!
Chapter 2: RAID in practise
In the chapter 1, we described the Raid in theory, let’s work with the RAID closer, and from the perspective of the system administrator.
The RAID can be created and managed via the MD subsystem in GNU/Linux system. For RAID management you have to use a tool mdadm. All information about the RAID status are stored in the file /proc/mdstat and we can see this file via command cat/proc/mdstat, or use command in tool mdadm, that interprets contain information and further elaborates.
In the case, that all drives are in the array, thus this array is functional. If one of the disc fails, we can talk about the degraded array. After inserting the new disc into the array, the missing data will be reconstructed (this does not apply to RAID 0).
Software RAID is usually set up from the partitions. If partitions, from which the RAID is composed, are identified by a numerical identifier fd, they can be automatically set up during a boot of system. However, this assumes, that the appropriate modules will be presented during start of system in the initrd image, which core uses for writing into the computer’s memory.
In this example, partitions 1 and 3 are always intended to build a RAID array:
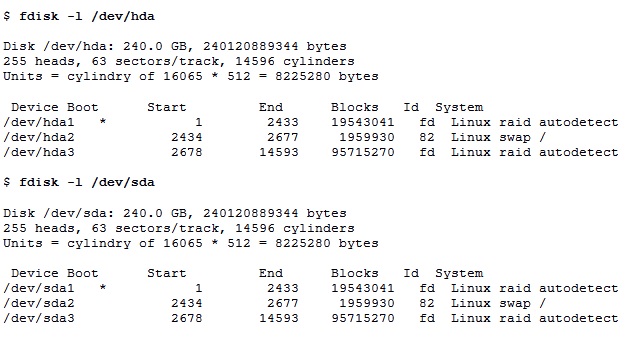
We create the array, with the exception of RAID 0, always in a degraded state, so immediately after creation, reconstruction starts. The switch -C marks creation of the array, -1 defines the type of RAID array, switch -n specifies the count of members. The individual partitions must be listed.
$ mdadm -C /dev/md1 -l1 -n2 /dev/hda1 /dev/sda1
With this command, we have just created the RAID 1 array with label: /dev/md1, which is consisted from partition /dev/hda1 and /dev/sda1.
At the newly established array we want to continue in creation of file system. You must not wait until the completion of the reconstruction field.
$ mkfs -t ext4 -j /dev/md1
Let move on. What if we find a problem with the disk and want to replace it?
If the problem is worse, Kernel (Core) marks automatically this disk by sign F as Failed, or remove it from the array. Array will be in a degraded state by this removing.
Also, you can manually remove this disk by using the well known tool mdadm. First of all, you have to marks this disk as failed and then completely remove this array by sign remove. The array will continue to operate in degraded mode.
$ mdadm /dev/md1 -f /dev/sda1
$ mdadm /dev/md1 -r /dev/sda1
After you can failed disk remove from server and add new one. New disk is neccessary to implemented into server, again.
$ mdadm /dev/md1 -a /dev/sda1
In this way, we add the new disk into /dev/md1 array and immediately the reconstruction of the degraded array begin. Its progress (in percentage) you can check out thanks to a dump file /proc /mdstat (see above).
Author: Jirka Dvořák

