This is another guide which will help you manage your virtual servers. Based on the feedback received from our customers, the previous article first step with VPS was very popular and helpful. Because the installation and administration of virtual servers running on the Windows operating system is a little bit different, we have decided to create a detailed manual to help you handle virtual servers running on MS Windows Server.
The login process and installation of the operating system is the same as the procedure published in the previous article Getting started with VPS. Therefore, we will continue from the moment the HTML5 console within the client interface is launched.
The MS Windows Server 2019 EN is the default OS for installation for all Windows VPS servers.
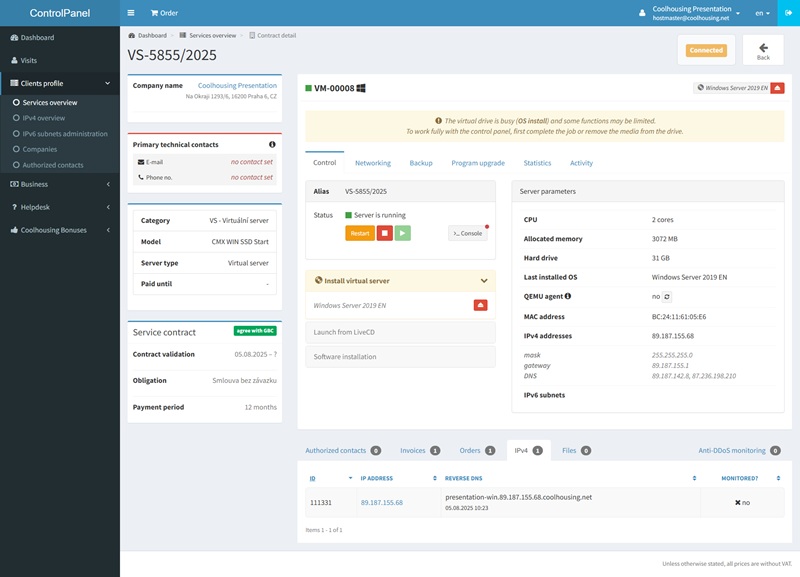
If you want to install a different version of MS Windows Server Standard, a different language version, or simply reinstall the server, you can do so from the server detail tab by selecting Install virtual server, checking Install from ISO image, and choosing from one of the many pre-prepared installation images. The available versions are:
- MS Windows Server 2016 Standard ed. EN
- MS Windows Server 2016 Standard ed. CZ
- MS Windows Server 2019 Standard ed. EN
- MS Windows Server 2019 Standard ed. CZ
- MS Windows Server 2022 Standard ed. EN
- MS Windows Server 2022 Standard ed. CZ
- MS Windows Server 2025 Standard ed. EN
- MS Windows Server 2025 Standard ed. CZ
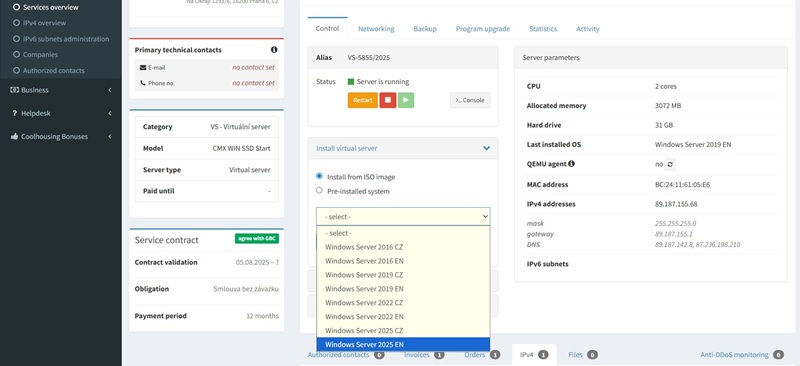
Confirm your selection by clicking the Start Installation button.
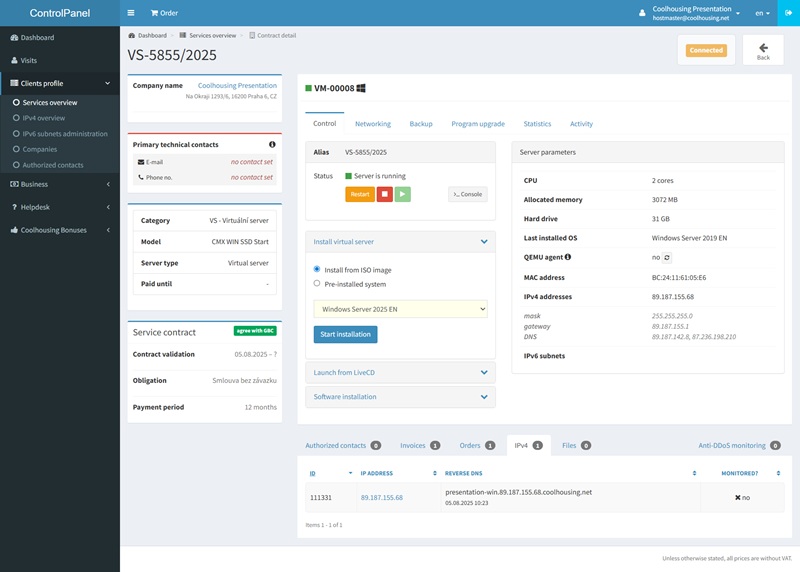
In this guide, we will now proceed in the manual with installing the default OS version, which is MS Windows Server 2019 Standard ed. EN. However, the installation steps and options are the same across all supported versions.
Click on the Next button on the initial screen of the installation.

For automatical Windows license activation after system installation, select the Standard version (Desktop experience). You can select The Datacenter version only if you want use own license.

The next screen will give you an option to divide the assigned space into partitions or to leave everything unchanged; you can proceed by clicking on the Next button once again.

Now the installation has started and everything should be completed within a few minutes.

The installation is completed with an automatic reboot. No other input from your side is required at this stage.

After a restart and completion of the installation…

…you will see a login page which will take you to the operating system environment. First, you need to enter the administrator’s password.

Click OK and enter identical passwords on both lines of the administrator account and click on the right arrow on the second line to confirm.

The password will be saved…

… and you will receive a notification.

Now press the Sign in button…

…and you will log into the environment of your newly installed server.

Because your server is connected to a public network, disable the option to detect your computer immediately after login by clicking on the No button.

Sending Ctrl+Alt+Del through the Console in the Control panel
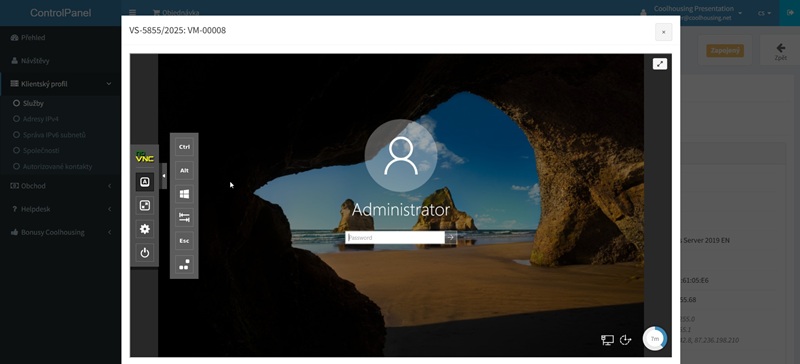
It may happen that instead of seeing the login prompt for Windows, you are only presented with the welcome screen asking you to press Ctrl+Alt+Delete to unlock.
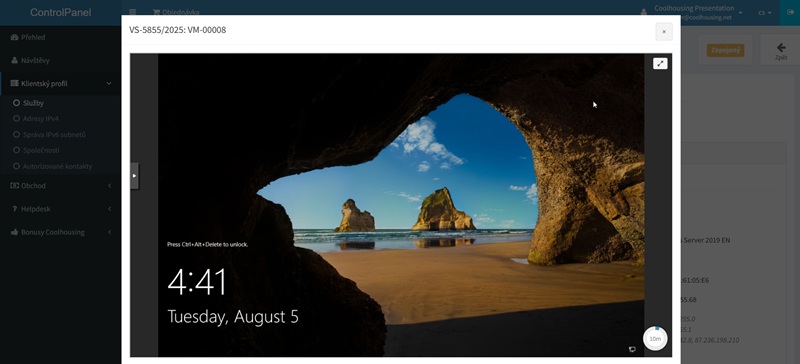
To send keyboard combination Ctrl+Alt+Delete to the server, use the buttons available in the left-hand menu inside the Console…
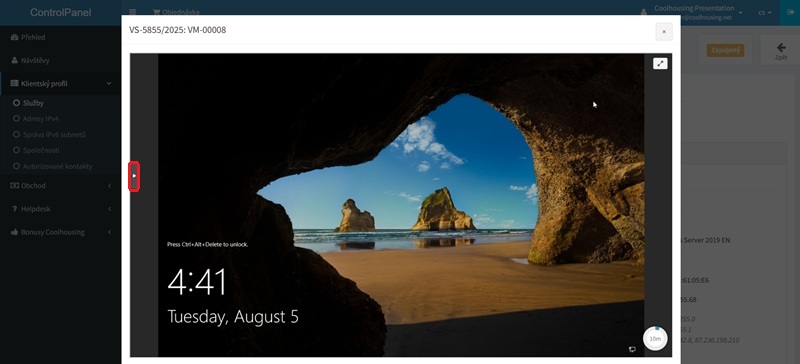
…where you will also find many other useful options.
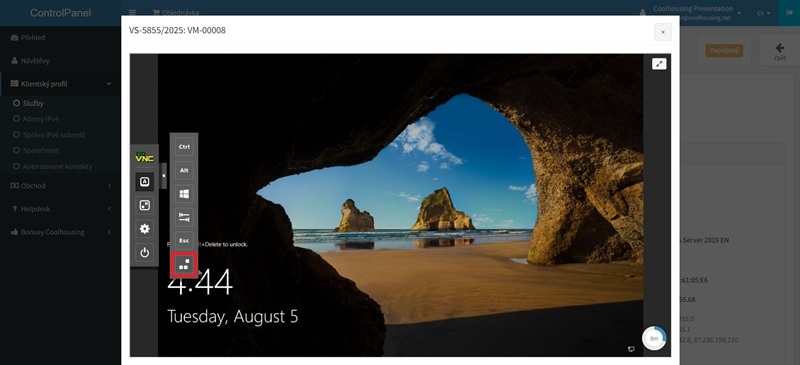
The system will immediately display the dialog window to enter your username and password.
Setting up the remote desktop protocol (RDP)
Access to the server through a remote desktop is not active in the default setting. You may turn it on using the Server Manager, menu Local Server, item Remote Desktop, by clicking on the Disabled option.

In the newly opened window…

…check the Allow remote connection to this computer option and confirm the pop-up notifying that the service has been activated…

…and because you will not connect to the server (at least not immediately after installation) from a network supporting authentication at the network level, it is necessary to uncheck the Allow connection only from computers running Remote Desktop with Network level Authentication (recommended).

Confirm by pressing Apply and OK.

Static IP address configuration
By default, the IPv4 and IPv6 server address is assigned through DHCP (Dynamic Host Configuration Protocol). However, this protocol is not suitable for server environment and therefore a static IP addresses should be used. Go back to the Server Manager, open the Local Server menu and select the Ethernet option by clicking on IPv4 address assigned by DHCP, IPv6 enabled.

The virtual server has one network interface (several interfaces may be available, but these lie in the realm of advanced VPS settings).

Right-click on the selected network interface and select Properties.

In the next IPv4 address setting window use the left mouse button and select the Internet Protocol Version 4 (TCP/IPv4) and click on Properties. This will activate the window.

In the newly opened window…

…click on Use the following IP addresses and Use the following DNS server addresses.

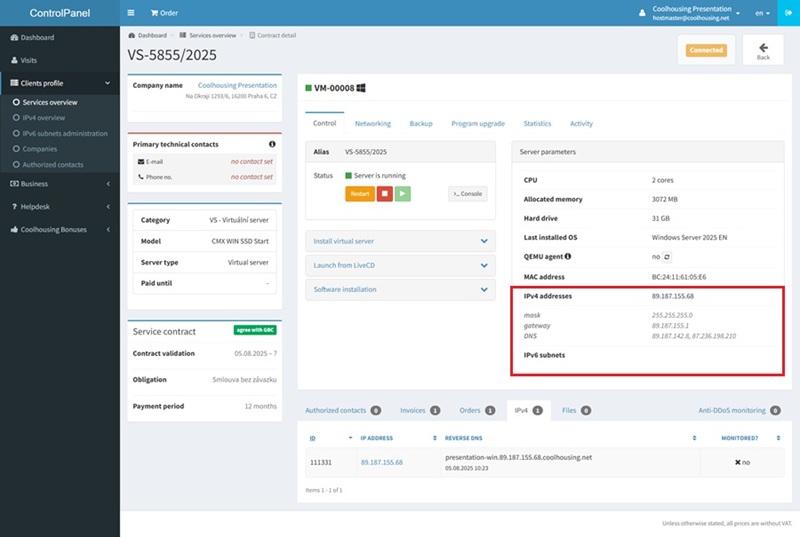
Your assigned network configuration can be found in the client section ControlPanel in the service detail.
The same process applies when configuring the IPv6 address.
By setting a static IP address, you will avoid many connection-related problems of your virtual server!
Internet Explorer Enhanced Security configuration
If you want to use MS Internet Explorer on your server to browse through websites, you might not appreciate the high level of security provided by the Enhanced Security feature. You may turn this function off in the Server Manager, menu Local Server, under item IE Enhanced Security Configuration, which is set to On by default.

Click on the On button, and the system will open the settings for this option…

…there, you can set both options (Administrators and Users) to Off. Confirm your selection by clicking on OK. Please be aware that harmful code may enter your server (among others) through an unsecured browser!

Date and time settings
Server time is important in particular when working with logs or when downloading updates, and therefore it is suitable to have the date and time as well as the time zone set based on the location of the server. You can rest assured that all Coolhousing virtual servers will always be located in the Czech Republic, in Prague at Vinohradská 190.
To select the time, open the Server Manager, go to the Local Server menu and open the Time zone, where the default value is (UTC-08:00) Pacific Time (US & Canada).

Click on (UTC-08:00) Pacific Time (US & Canada) and the system will open up a new window with additional settings.

You may set the current date and time by selecting the Change date and time option…

Set the time zone by clicking on Change time zone.

The correct time zone for the Czech Republic is (UTC+01:00) Belgrade, Bratislava, Budapest, Ljubljana, Prague.

You may further complement the above settings by activating time synchronization with Internet servers.

Click on the Internet Time tab and then on Change settings.

Time synchronization is usually set to time.windows.com.

However, you may select any NTP server – perhaps one closer to Prague. A list of available and, most importantly, public NTP servers may be found at http://phoenix.inf.upol.cz/~bazgierv/ntp.html. We used the tik.cesnet.cz server, which we simply entered in the Server field.

Always confirm your selection by pressing the OK button.
Operating system activation
After the operating system is installed in the virtual server environment, the server is automatically activated. No action is required from you. You may verify this fact in the Server Manager, Local Server menu and under Product ID. The Server ID is always a unique string of characters but the attribute in the parentheses (activated) is important.

If your virtual server is not activated, please contact customer support at info@coolhousing.net
System update
Server security should be your top priority, and therefore operating system updates should not be avoided. Immediately after installation, the system should display in the Server Manager, menu Local Server, under Last installed updates with the value Newer.

This situation needs to be changed, and therefore click on Newer and in the next window on the Check for updates.

This will initiate the update process, which usually needs to be completed with a restart.

The server usually waits for the administrator to confirm the restart. However, it is possible to plan the restart after the update is completed or when the server is not active. Open the Settings window, and under Windows Update scroll down to Update Status, where you will find the Change Active hours option.

Here you may set a time interval when the server is busy and automatic restart is not allowed.

Automatic Windows Login configuration
Usually after a restart and based on system updates, you may appreciate the option to automatically log into Windows. Setting up automatic login is very easy. Go to the Taskbar and click on the Magnifying glass icon (Search)…

… enter the following command: “netplwiz” (without quotation marks) in the field, and confirm.

The system displays the User Accounts window where you can uncheck Users must enter a user name and password to use this computer.

Click on Apply…

…the system will ask you to enter the user account password where the system will log in automatically. In our case we have only one account on the server called the Administrator; however, if you have several user accounts on the server, you may select any of them.

Confirm all settings by pressing the OK button. Now, after each restart the selected user is automatically logged in Windows. Keep in mind that this setting directly impacts the security of your server!
Program initiation after startup
You may find this setting useful when the automatic login feature is activated, but it is not necessary. There are other benefits as well. Open the Start menu and select Windows System and then Run.

Enter “shell:startup“ (without quotation marks) into the newly opened Run window and confirm your selection.

The system will open Windows Explorer in the Startup menu, which you can get to through a cumbersome path and through hidden files at “C:\\Users\Administrator\AppData\Roaming\Microsoft\Windows\Start Menu\Programs\Startup“ (the path is valid for Administrator). In this folder you may use the context menu to create a program shortcut, which you want to launch after startup, or you may simply drag-and-drop this shortcut to this folder either from the desktop or from the Start menu.

After the user is logged in, the system automatically launches all programs (and possibly also scripts) from the Startup folder.

